


来自好奇吖斌的投稿,感谢~
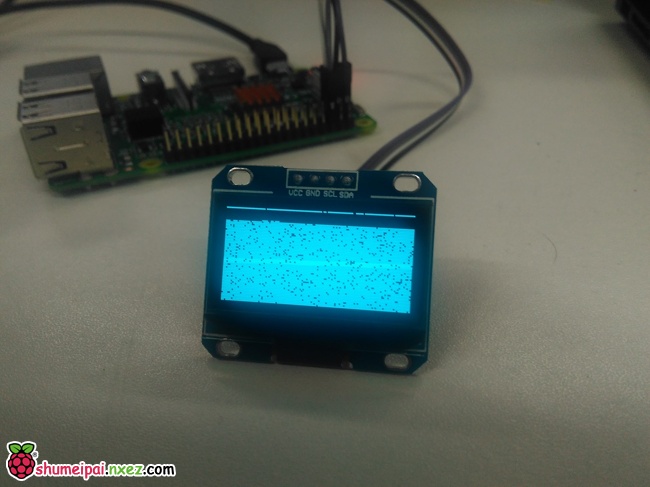
最近在学习树莓派,驱动OLED屏时出现了一个问题,就是花屏,折腾了两天后发现原来这个OLED的驱动芯片不是SSD1306而是SH1106,所以用Adafruit_Python_SSD1306这个库是花屏的。
OLED的驱动芯片有好几种,但是有的库只支持SSD1306芯片,所以当你的OLED屏出现花屏时就应该是芯片和库没对应上,购买OLED屏时最好购买i2c的SSD1306芯片的,库多且接线比较简单。
Python有两个可以用的OLED库:
- Adafruit_Python_SSD1306库—>只支持SSD1306
- Luma.oled库—>支持SSD1306 / SSD1322 / SSD1325 / SSD1331 / SH1106
Adafruit_Python_SSD1306库与Luma.oled库的安装说明(看不懂英文没关系,看下面我会说)。
- SSD1306 OLED Displays with Raspberry Pi and BeagleBone Black
- Luma.OLED: Display drivers for SSD1306 / SSD1322 / SSD1325 / SSD1331 / SH1106
本文的Luma.oled库参考了I2C接口的OLED在树莓派3上的应用 ,但这是旧版本的,新版本库不是这样安装,请看下文。
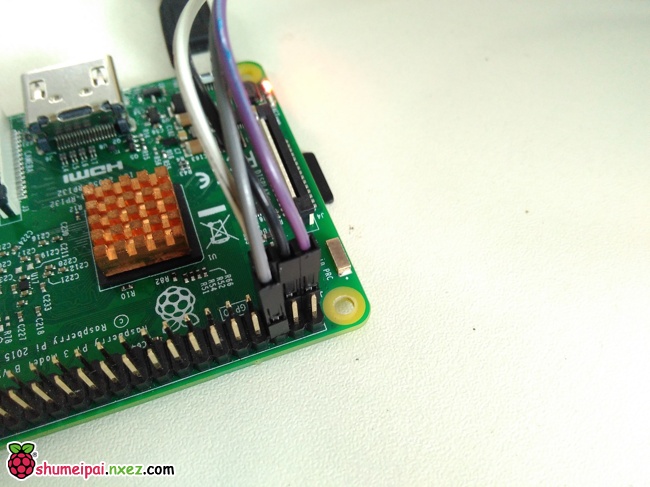
i2c接线

| OLED引脚 | 树莓派物理BOARD引脚 |
|---|---|
| VCC | 1号 |
| GND | 6号 |
| SCL | 5号 |
| SDA | 3号 |
接好线后就是像一个L型的。
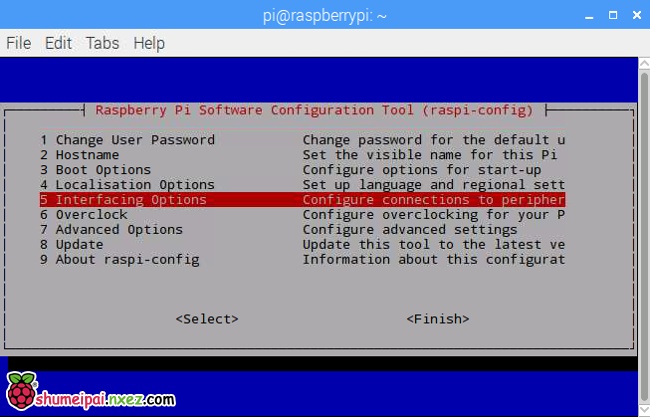
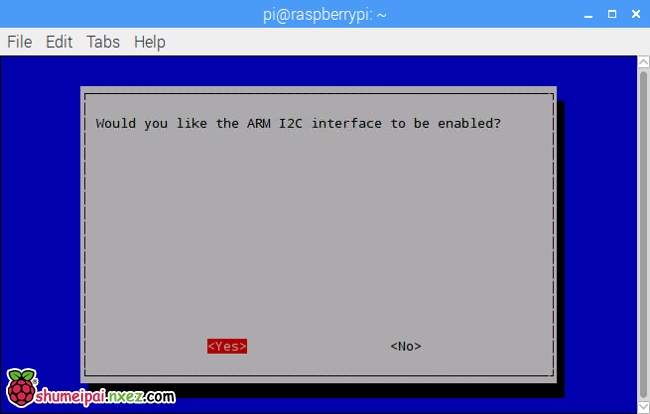
开启i2c功能
| 123 | sudo apt-get install -y python-smbussudo apt-get install -y i2c-toolssudo raspi-config |
打开树莓派配置选择5 Interfacing Options。
选择P5 I2C回车激活I2C。
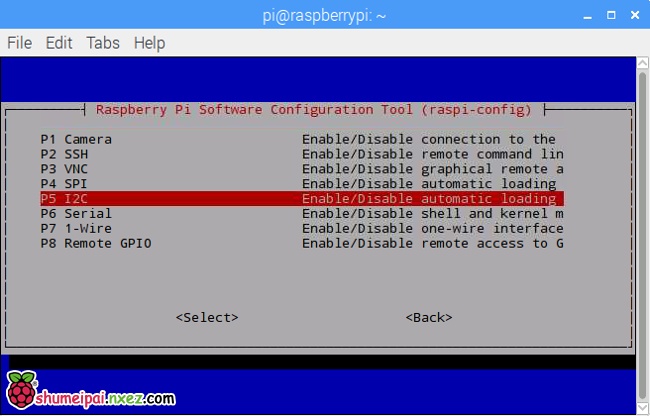
按回车启动就得了。
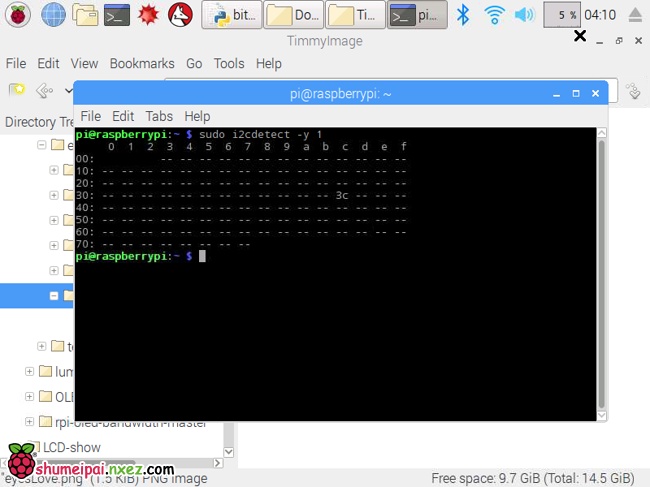
查看i2c地址
| 1 | sudo i2cdetect -y 1 |
然后你能看到下面的地址,3c就是oled屏的i2c地址了,说明已经成功开启i2c啦
– 安装Adafruit_Python_SSD1306库
终端输入下面命令。
| 12345678 | sudo apt-get updatesudo apt-get install build-essential python-dev python-pipsudo pip install RPi.GPIOsudo apt-get install python-imaging python-smbussudo apt-get install gitgit clone https://github.com/adafruit/Adafruit_Python_SSD1306.gitcd Adafruit_Python_SSD1306sudo python setup.py install |
安装好Adafruit_Python_SSD1306库后,cd examples进入例程目录,ls查看文件,以shapes.py例程说明。
| 123456789101112131415161718192021222324252627282930313233343536373839404142434445464748495051525354555657585960616263646566676869707172737475767778798081828384858687888990919293949596979899 | import time import Adafruit_GPIO.SPI as SPIimport Adafruit_SSD1306 import Imageimport ImageDrawimport ImageFont # Raspberry Pi pin configuration:RST = 24# Note the following are only used with SPI:DC = 23SPI_PORT = 0SPI_DEVICE = 0 # Beaglebone Black pin configuration:# RST = 'P9_12'# Note the following are only used with SPI:# DC = 'P9_15'# SPI_PORT = 1# SPI_DEVICE = 0 # 128x32 display with hardware I2C:disp = Adafruit_SSD1306.SSD1306_128_32(rst=RST) # 128x64 display with hardware I2C:# disp = Adafruit_SSD1306.SSD1306_128_64(rst=RST) # Alternatively you can specify an explicit I2C bus number, for example# with the 128x32 display you would use:# disp = Adafruit_SSD1306.SSD1306_128_32(rst=RST, i2c_bus=2) # 128x32 display with hardware SPI:# disp = Adafruit_SSD1306.SSD1306_128_32(rst=RST, dc=DC, spi=SPI.SpiDev(SPI_PORT, SPI_DEVICE, max_speed_hz=8000000)) # 128x64 display with hardware SPI:# disp = Adafruit_SSD1306.SSD1306_128_64(rst=RST, dc=DC, spi=SPI.SpiDev(SPI_PORT, SPI_DEVICE, max_speed_hz=8000000)) # Alternatively you can specify a software SPI implementation by providing# digital GPIO pin numbers for all the required display pins. For example# on a Raspberry Pi with the 128x32 display you might use:# disp = Adafruit_SSD1306.SSD1306_128_32(rst=RST, dc=DC, sclk=18, din=25, cs=22) # Initialize library.disp.begin() # Clear display.disp.clear()disp.display() # Create blank image for drawing.# Make sure to create image with mode '1' for 1-bit color.width = disp.widthheight = disp.heightimage = Image.new('1', (width, height)) # Get drawing object to draw on image.draw = ImageDraw.Draw(image) # Draw a black filled box to clear the image.draw.rectangle((0,0,width,height), outline=0, fill=0) # Draw some shapes.# First define some constants to allow easy resizing of shapes.padding = 2shape_width = 20top = paddingbottom = height-padding# Move left to right keeping track of the current x position for drawing shapes.x = padding# Draw an ellipse.draw.ellipse((x, top , x+shape_width, bottom), outline=255, fill=0)x += shape_width+padding# Draw a rectangle.draw.rectangle((x, top, x+shape_width, bottom), outline=255, fill=0)x += shape_width+padding# Draw a triangle.draw.polygon([(x, bottom), (x+shape_width/2, top), (x+shape_width, bottom)], outline=255, fill=0)x += shape_width+padding# Draw an X.draw.line((x, bottom, x+shape_width, top), fill=255)draw.line((x, top, x+shape_width, bottom), fill=255)x += shape_width+padding # Load default font.font = ImageFont.load_default() # Alternatively load a TTF font.# Some other nice fonts to try: http://www.dafont.com/bitmap.php#font = ImageFont.truetype('Minecraftia.ttf', 8) # Write two lines of text.draw.text((x, top), 'Hello', font=font, fill=255)draw.text((x, top+20), 'World!', font=font, fill=255) # Display image.disp.image(image)disp.display() |
按照你的oled屏修改代码,程序默认是12832的,你的oled屏是这个就不用改直接运行就OK。
如果是12864的I2C就像下面那样修改,把12832加#注释,12864#注释去掉保存。
| 12345 | # 128x32 display with hardware I2C:#disp = Adafruit_SSD1306.SSD1306_128_32(rst=RST) # 128x64 display with hardware I2C:disp = Adafruit_SSD1306.SSD1306_128_64(rst=RST) |
终端输入sudo python shapes.py或用Python打开文件运行就能看到OLED屏有显示了。
– 安装Luma.oled库
终端输入下面命令。
| 1234 | sudo apt-get install python-dev python-pip libfreetype6-dev libjpeg-devsudo -H pip install --upgrade pipsudo apt-get purge python-pipsudo -H pip install --upgrade luma.oled |
注:如果你需要安装Python3的Luma.oled库的则按下面对应的Python3版本修改上面的命令进行安装。
pip ⇒ pip3
python ⇒ python3
python-dev ⇒ python3-dev
python-pip ⇒ python3-pip
如果安装Luma.oled库时出现红字错误,请继续执行命令重试,那是因为网络问题下载一个叫Pillow的库不成功。
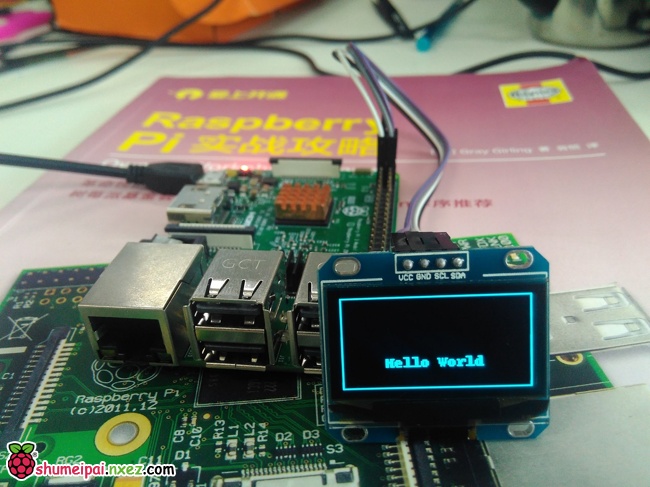
安装好Luma.oled库后新建文件命名为oled.py,复制粘贴下面代码。参考这里使用说明
| 1234567891011121314 | from luma.core.interface.serial import i2c, spifrom luma.core.render import canvasfrom luma.oled.device import ssd1306, ssd1325, ssd1331, sh1106 # rev.1 users set port=0# substitute spi(device=0, port=0) below if using that interfaceserial = i2c(port=1, address=0x3C) # substitute ssd1331(...) or sh1106(...) below if using that devicedevice = sh1106(serial)#这里改ssd1306, ssd1325, ssd1331, sh1106 with canvas(device) as draw:draw.rectangle(device.bounding_box, outline="white", fill="black")draw.text((30, 40), "Hello World", fill="white") |
如果你的oled驱动芯片是其它型号找到device = sh1106(serial),把sh1106改成库支持的其它型号。
树莓派上用Python2打开oled.py运行就能看到下图的Hello World。
能驱动成功后我们去下载Luma.oled的examples代码。
然后是examples里面的例子怎么用呢?如果是非ssd1306芯片直接运行还是花屏的,因为那个examples的代码需要修改。
下面以pi_logo.py为例参考上面那个Hello World的例子修改成自己OLED芯片型号的(文件放在在examples内)。
| 123456789101112131415161718192021222324252627282930313233343536373839 | #!/usr/bin/env python# -*- coding: utf-8 -*-# Copyright (c) 2014-17 Richard Hull and contributors# See LICENSE.rst for details.# PYTHON_ARGCOMPLETE_OK """Display the Raspberry Pi logo (loads image as .png).""" import os.pathfrom PIL import Image from luma.core.interface.serial import i2c, spifrom luma.oled.device import ssd1306, ssd1325, ssd1331, sh1106 def main():img_path = os.path.abspath(os.path.join(os.path.dirname(__file__),'images', 'pi_logo.png'))logo = Image.open(img_path).convert("RGBA")fff = Image.new(logo.mode, logo.size, (255,) * 4) background = Image.new("RGBA", device.size, "white")posn = ((device.width - logo.width) // 2, 0) while True:for angle in range(0, 360, 2):rot = logo.rotate(angle, resample=Image.BILINEAR)img = Image.composite(rot, fff, rot)background.paste(img, posn)device.display(background.convert(device.mode)) if __name__ == "__main__":try:serial = i2c(port=1, address=0x3C)device = sh1106(serial)main()except KeyboardInterrupt:pass |
Python运行上面的程序oled屏会出现一个能旋转的树莓派LOGO。

全文完。
来源:解决树莓派驱动OLED(非SSD1306)花屏问题
作者:好奇吖斌
原文链接:https://shumeipai.nxez.com/2017/09/13/solve-the-raspberry-pi-drive-oled-problem.html
叨叨几句... NOTHING